Plant 1
For the first technique we are going to use a plant that already has a nice paint job. This way, we won’t have to paint the finished plants at all. This is also a prefect plant to illustrate our most basic technique with. We made these pieces using something called scaling-down.

Unless you are making a corn field or something similar you don’t want all of your plants to be the same size, it just doesn’t look natural! Basically, any time you cut a plant shorter you are scaling down. We do this for just about every plant we make. It is very useful for extending your supply of plants since the clippings can also be reused. Since this plant had such large leaves we decided to use a dispersed setting when basing them. That means that the stalks of individual plants are spread out across the base with space intentionally left between each one.
Plant 2
 This plant had very nice small leaves but we didn’t like the color, so we simply repainted it. To make this plant we used a closely grouped setting so that all stalks were attached in groups using one center point (or close to it) on the base.
Since we wanted the larger pieces to be taller than the original piece, we mounted them up on a pedestal (in this case a coffee stirrer). The pedestal was then concealed with concentric rows of decreasing sizes and then painted the same as the rest of the plants. We call this scaling up, and (like scaling down) is a good way to get the most out of your plant supply.
Plant 3

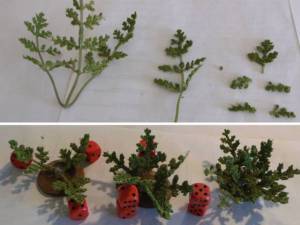
This time we are using a plant that came already flocked. It’s very convenient since you don’t have to do any painting and you get the added bonus of a totally different textured plant from the painted ones. Since the usable portion of this plant (the leaves) is in very small pieces, we used a radial mounting technique.

The leaves were glued on in stacked rings with the bottom row of each ring only slightly above the ground, and each succeeding ring getting a progressively higher angle until the final one is sticking straight up in the air. The number of rings used and the number of leaves used per ring depends on the size of plant being made. In this case you can also vary the size of the leaf by varying how much of the tip is cut off.


